1.41: New Feature Summary
1.41 includes over thirty new user requested features. Some of the big hitters include auto sync for mobile, reordering inspections, and a photo repository.
Version 1.41 was released on March 27 on the desktop. The mobile app version will be released shortly.
For those of you who aren’t familiar with our app: SolarGrade is a cloud-based fieldwork management platform for renewable energy assets.
Inspections
Add numerical value to issue items
Previously, only Sections and Categories were numbered. Now, report numbering in inspections continues down to the Item level. This standardizes issues across field checklists and reporting, which makes it easier to find issues for remediation.
This is also a great workaround if you don’t like Issue Items being alphabetized — you can reorder to your heart’s desire.
Inspections (Desktop Only)
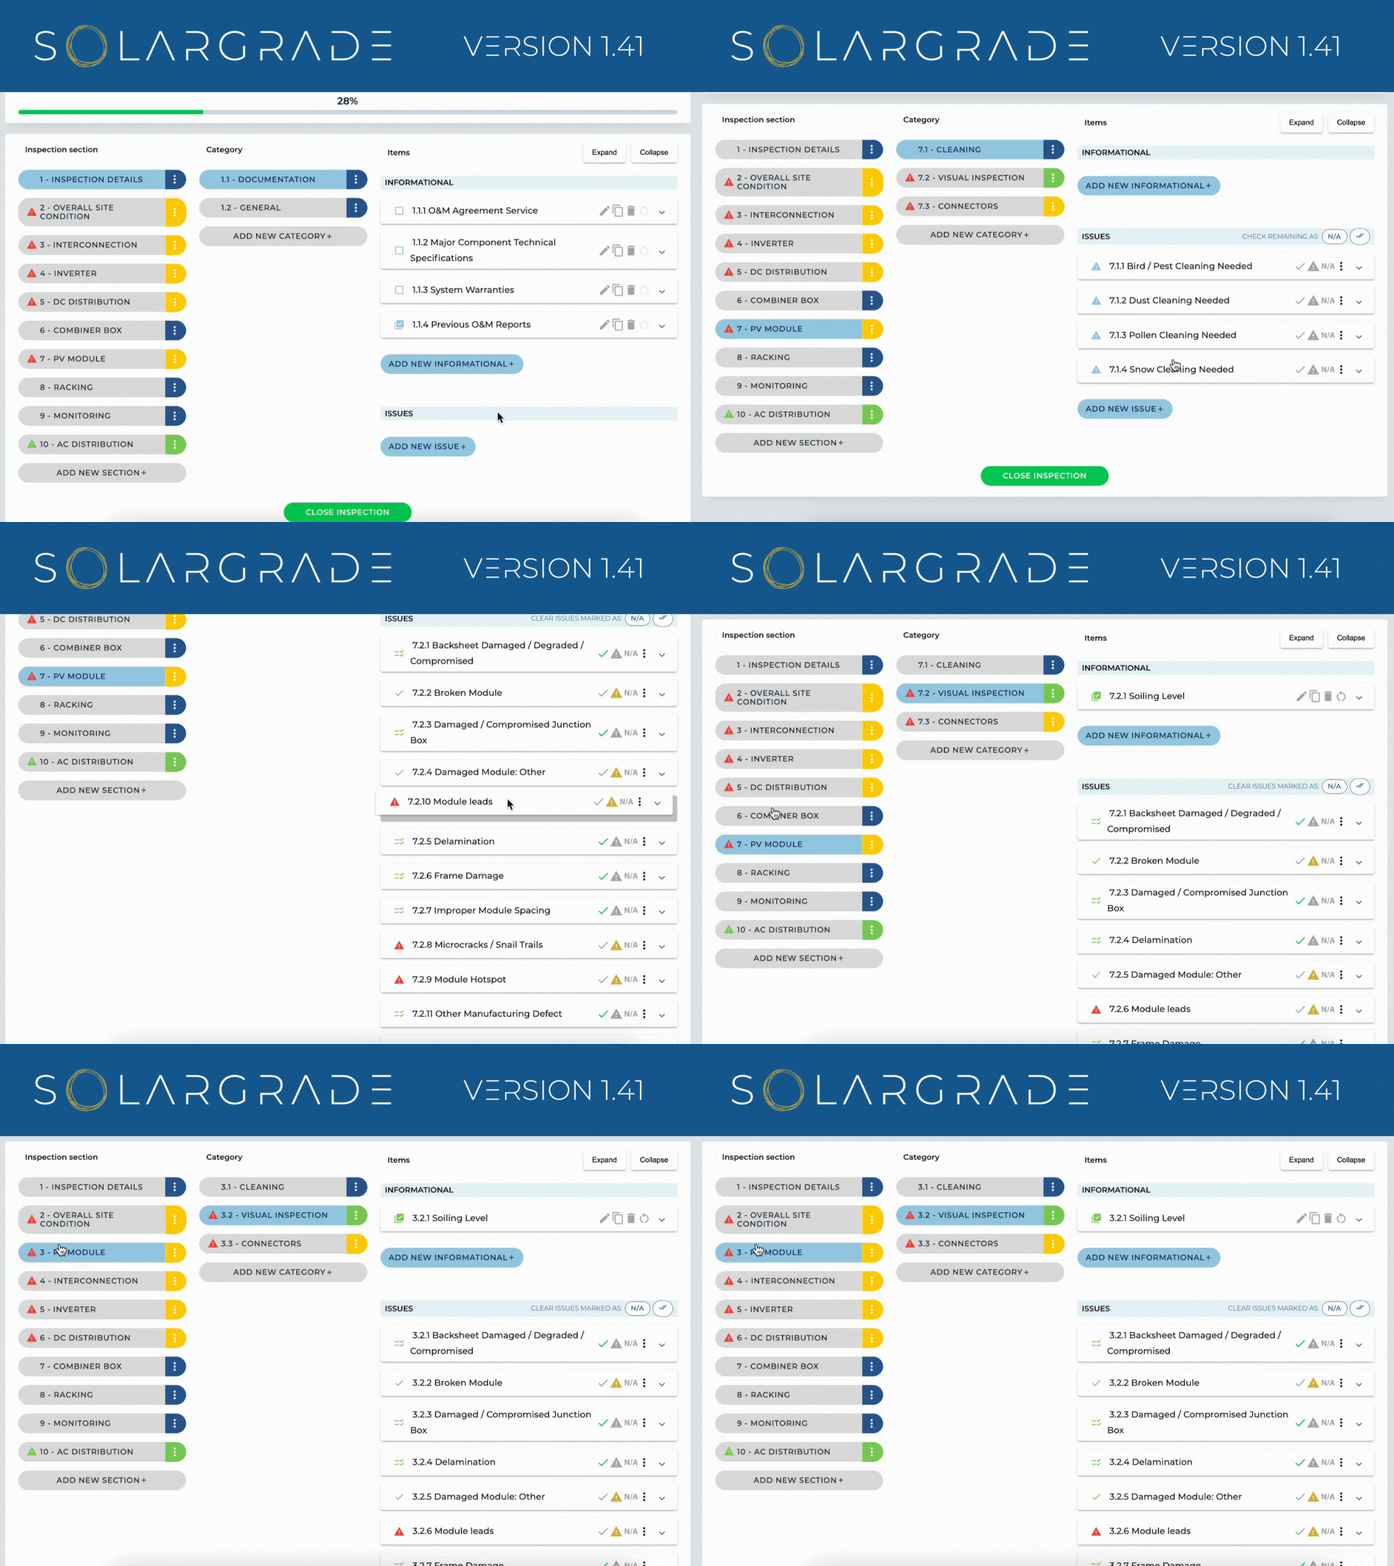
Ability to drag and re-order sections, categories, and items
Inspections got a makeover and are far more dynamic! Now you can drag sections, categories, and items to reorder the inspection to be the way you want. This is a huge win for a lot of you — it will simplify reporting and make it more efficient.

Ability to merge issues within an inspection
Accidentally created two of the same issue? No problem. Now you can merge two issues and condense all of the photos and locations into 1 issue with multiple locations. The occurrence values will be added together. You will have the option to choose which description and which severity you want for the merged issue.
To merge an issue:
- Select the 3 vertical dots near the issue title
- Select MERGE
- Choose the issue you would like to merge with
- Choose the description and severity fields you would like to include
- Click MERGE
Add ticket labels to inspection map
The inspection map issue number labels so users can reference certain issues in the same way they do for reports or for the map view on the mobile app.
Note: this feature is not interactive, so you will still have to locate the issue within the inspection.
Scrub photo location when adding photos
All our desktop folks can finally get in on the mobile app fun! If you want to upload a photo from your desktop, and that photo has location data, you will have the option to choose that photo’s location as the issue location. It’s the perfect solution if you can’t remember where exactly you were when you snapped that photo.
Ability to bulk add progress trackers to an inspection
Multiple choice checkboxes are our best friend — and now yours too! If you have several Progress Trackers going at one time and want them all added to an inspection, just check the ones you want to include and select SAVE.
Date range changes
We’ve changed some inspection pre-site information to fit all kinds of site visits. You’ll no longer see “Date Range” on your inspection information — it now says “Enter Date(s)” and allows for a singular value if you’re only spending 1 day on site.
Inspections (Mobile App Only)
Auto Sync issues and items (NOT photos)
*Cue Etta James’s “At Last”*
The auto sync will be released on the mobile app version of 1.41. This is an optional feature that you can enable in the Cloud Sync section of your mobile app. How is Auto Sync going to work? So glad you asked:
- It is going to work with any type of connection, not only wifi and will have no speed threshold.
- Photos will still need to be synced manually.
- If there is a connection, the elements will be synced as soon as they are added/edited. If there is no connection, the sync will start when the device is online.
- The app will need to be open to start the auto sync. Then, it will continue if the app is minimized (not closed) or the screen is turned off.
Ungroup Pins with Zoom
Say you’re gazing at the sweet, sweet sight of photovoltaic modules from the map view on your device, when you notice your colleague on site has created an issue with 7 locations. Now, when you zoom in closer and closer to those sweet, sweet PV modules, the location pins will ungroup so you can see every location.
Projects
Toggle to add MW instead of kW
We’re taking ‘trimming inefficiencies’ to the extreme as we even eliminate math. If you’re adding a utility scale project, you don’t need to convert your megawatts down to kilowatts. You can now select your preferred unit when inputting the project size. Already have it in kW? Fear not — clicking the MW radio button will do all the math for you.
Project table improvements
We hear you — if you have a lot of projects, filter that projects table down to the project you want to see, and click into an inspection, you shouldn’t have to refilter the table again when you go back to the projects page. Now, the filtered Projects table will remain when navigating backwards from an inspection. In fact, it’ll take you right back to the Inspection Log where you left off.
Ability to rotate a PDF drawing
When you upload a PDF for your project drawings, you can rotate pages so that they are easier to read. To do this:
- Hover over the page you wish to edit
- Select the rotate icon in the top right corner of the page
Tasks
Ability to filter projects when exporting tasks to CSV
Need to export all the tasks for a particular client? This just got a whole lot easier. No longer are you combing through your list of projects trying to remember who owns what. Now you can filter your projects, including by client, when exporting tasks to a CSV file.
Include column for “Inspection Scope” on CSV export
Speaking of new updates to task CSV exports, we’ve added a new column: Inspection Scope. This will come in handy as you have more and more inspections that use the same template name.
Reports
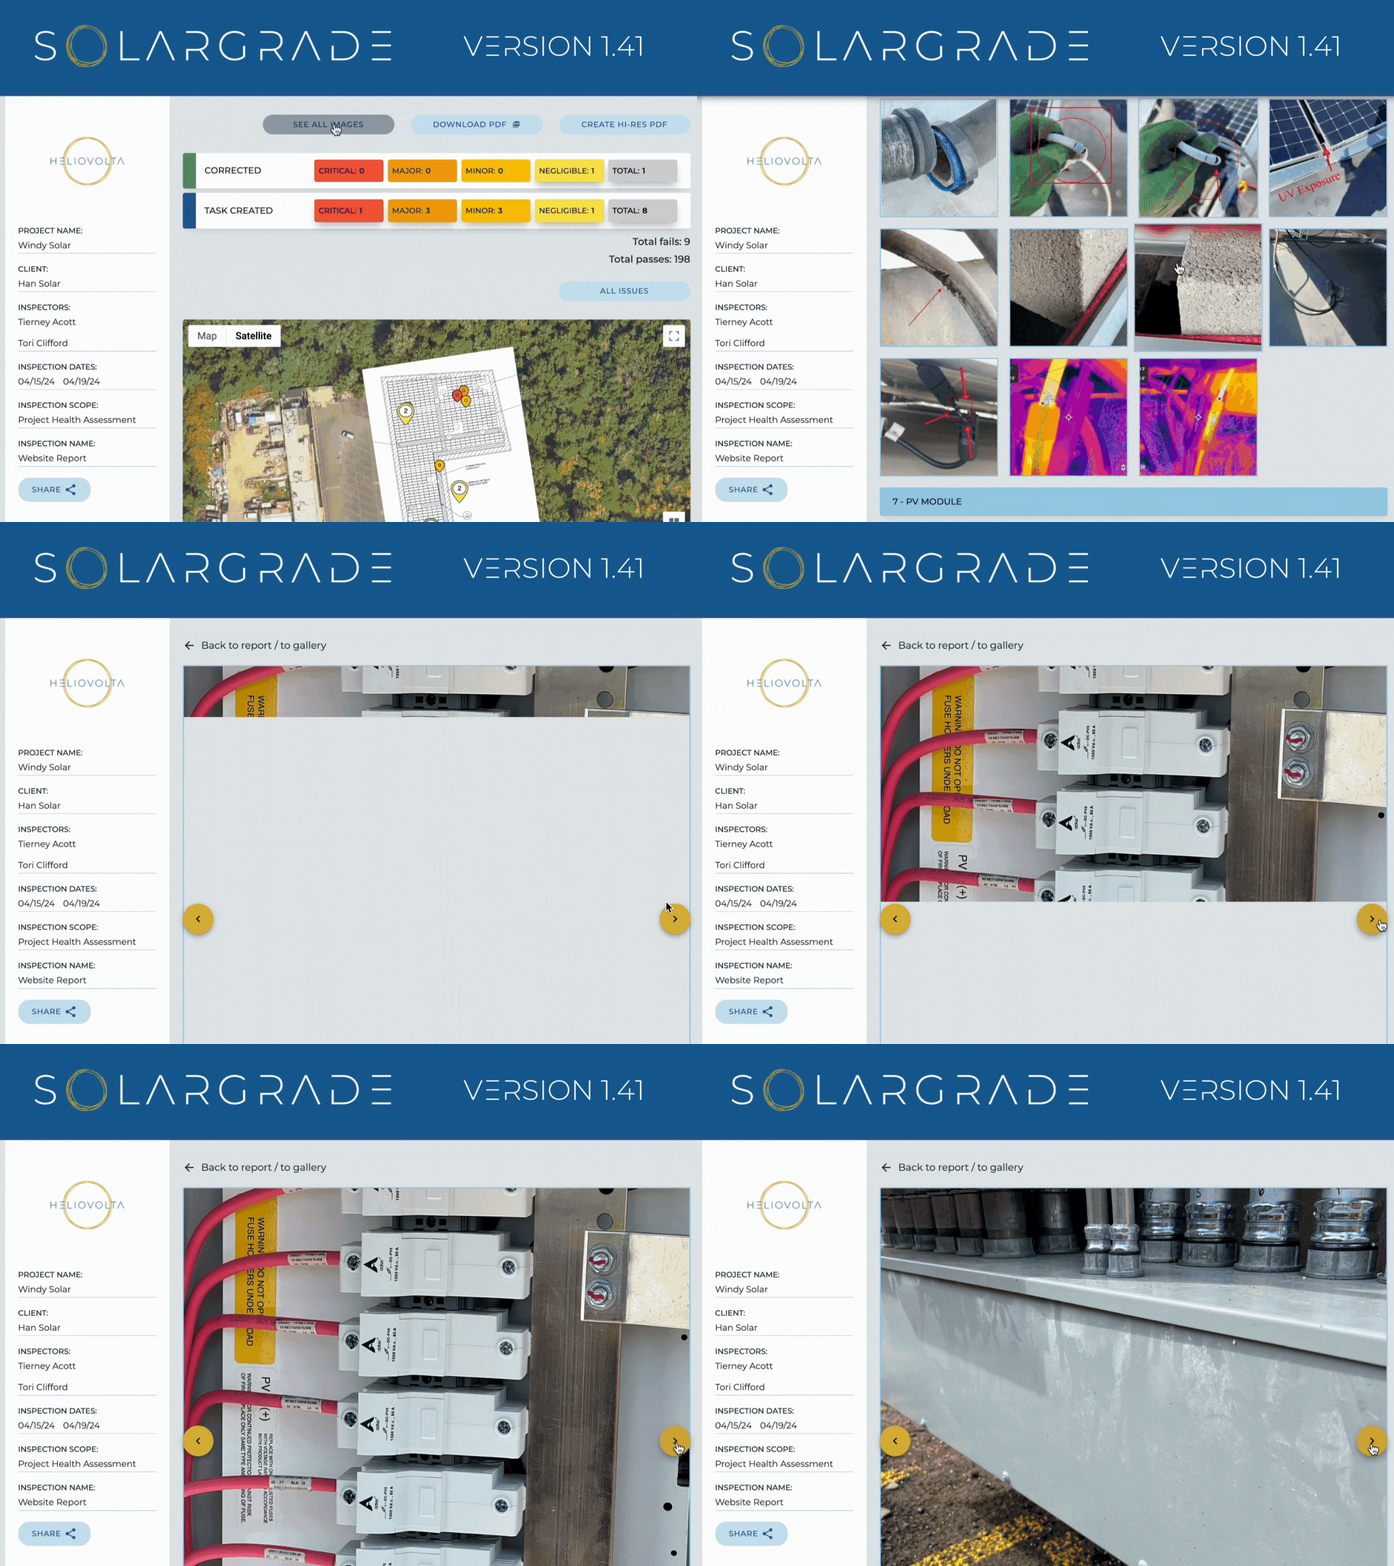
Introducing: A Photo Repository
This feature is essentially a “gallery view” of your report. It can be accessed by selecting the “See All Photos” button at the top of your interactive report. This button will take you to that report’s photo repository, where all photos will be organized by section and category and you can filter in a bunch of different ways.

Ability to choose report customization per inspection
We’ve added a new way to add a report customization to a project — by inspection. (Previously, it was only by project.) This will be useful if you want to have an internal report customization and an external / client facing report customization. In order to access this new feature, you need to:
- First select the gear icon to the right of the “Generate Report” button within an inspection.
- Select “Choose Report Customization”
- Select your customization
- Click the “Generate Customization” button
Bulk share multiple reports with one user
Have a client who needs historical reports for a particular site? Not a problem. Now you can bulk share multiple reports to one user.
- To do this, navigate to the report page
- Select the checkboxes on the left of the reports you wish to share
- Select the share icon at the top of that header
Include all issue locations on PDF reports
PDF reports are static, but that doesn’t mean it should omit any information. Now, when you export a report to PDF, it will include all the location data for an issue — not only the main issue location.
Ability to download PDF from Reports page
Need a PDF report in a pinch? We’ve got you covered. Go to the Reports page, find your report, and click the download icon in the menu on the right. That will export that particular report to PDF so you can print it out and be on your merry way.
Templates
Ability to combine templates
Are you ready to revolutionize your templates? In this Enterprise-level feature, you can merge templates together. So, if you have an SMA specific checklist you want to lump in with your standard preventive maintenance checklist, you can merge them together. You shouldn’t need to cleanup afterwards as all sections, categories, and items with the same name will be combined.
To merge templates:
- Navigate to your Templates tab
- Find the template you wish to merge
- Select the “Merge” icon (to the left of the copy icon)
- Choose the template you wish to merge it with
- Select MERGE
Make certain issue fields required
Need to make sure your team checks certain items on-site? We’ve got your back. When you create your template, there is now a toggle at the bottom of every Issue Item to indicate if it is required. If it is required, it will appear in an Inspection with a red asterisk (*) next to the title.

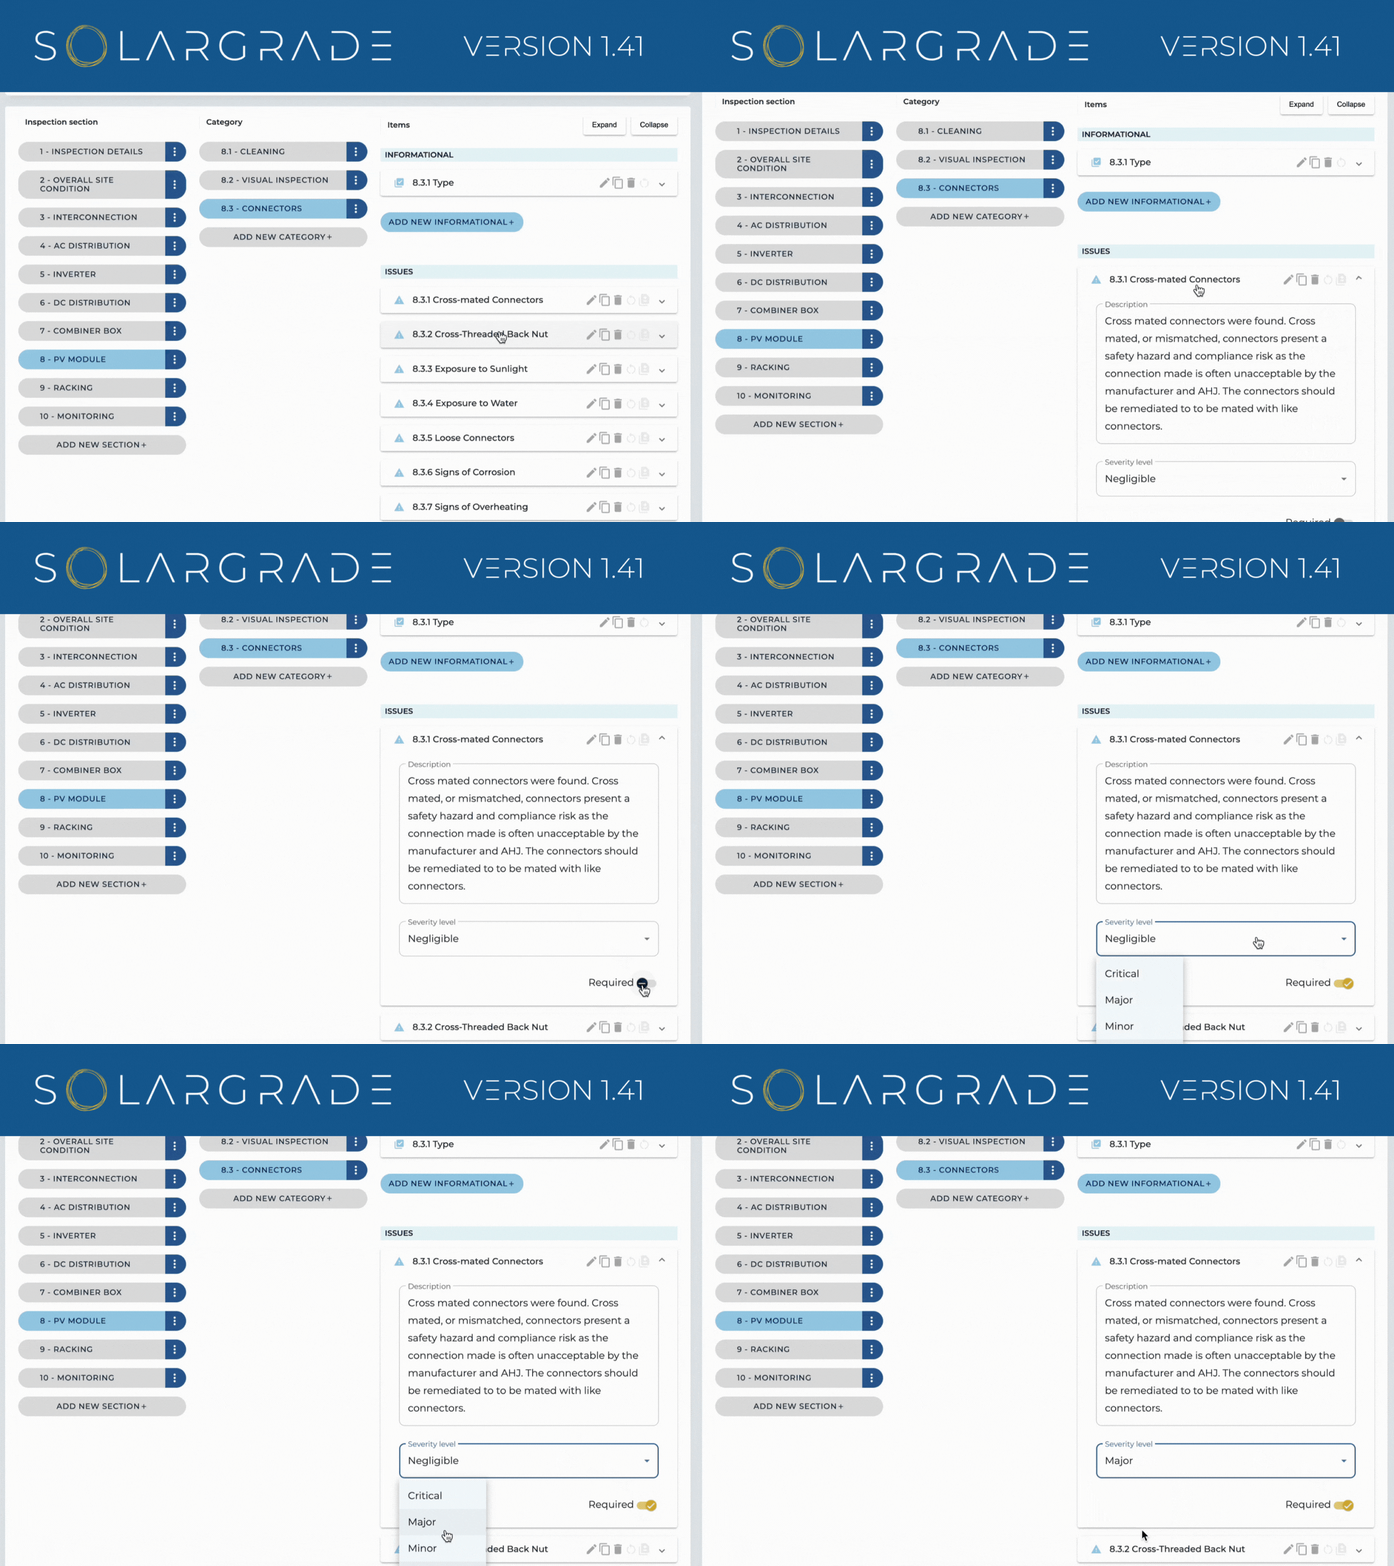
User pre-selects default severity in Templates
Another big win for efficiency! In templates, you can now preset an issue severity, so that when you create an inspection from that template, all the severity levels are preset should you mark that Issue as “fail” on-site. It makes for fewer clicks when you’re creating an issue.
Overall
Organization
As you might have noticed, we’ve moved some of the tabs around. The Teams, Templates, Reports, and Recycle Bin tabs all fall under the dropdown menu called Space. Why is that? We’re making room for some big new features…
Email notification changes
We’ve made a few changes to email notifications. You will only get notifications about date changes if they occur in the future. And you will also now receive email notifications if their user role changes to/from Admin or Manager.
Recycle Bin — Includes user information
We are all about data protection, and sometimes that requires internal transparency. Now, when a project, inspection, template, report, or client ends up in the recycle bin, you’ll be able to see who put it there.
Note: this does not apply to historical data; it only applies to items deleted after 1.41 was released.
Head to our Support Center from the app if you have any questions. Otherwise, feel free to drop us a line too!
The SolarGrade Team
Featured Resources
Articles
2025 SolarGrade PV Health Report
We analyzed field data from over 1,000 projects to explore the impact of construction quality on project value.
